Moving Crossplane package authoring from plain YAML to IDE aided development


February 18, 2022
Taylor Thornton
Reading time: 11 min read
Share:
As we explained in our alpha announcement post, a top pain point we’ve heard from the community and our customers is how difficult it is to compose infrastructure, which, if we’re being honest is not terribly surprising. Today, an individual authoring a Crossplane package is mostly presented with a plain text editing experience which is a far cry from the IDE aided development experience many of us have become accustomed to (think WYSIWYG versus Google Docs or Microsoft Word).
In this blogpost, we’ll cover why that is and we’ll start to dive into what we’ve done to try to alleviate some of that pain. Most notably we’ll dive into how we’re providing a mechanism for rendering validation/linter diagnostics to the author, while they are authoring/editing their composed infrastructure.
Background
Most of what we’ll discuss will be in the context of Visual Studio Code; however I’d like to stress that the topics are not restricted to VS Code. As we’ll see, much of what we’ll be covering can be applied to Atom, Goland, Vim, etc.
Great, with that in mind, let’s jump in.
Today, when we’d like to author/edit a Kubernetes resource manifest, many of us start by adding the following extensions to your VS Code instance:
Arguably, in most cases this will be sufficient. From the YAML language support extension, you’ll get a lot of great features:
- YAML validation
- Auto completion
- Formatting
- etc
And from the Kubernetes extension, you’ll be able to:
- Browse Helm repos.
- Lint YAML files for potential problems/suggestions.
- Edit resource manifests and apply them to your cluster.
- View diffs of a resource’s current state against the resource manifest in your Git repo.
- Get and follow logs.
- etc
In general, both extensions do a great job validating/linting resource manifests against the resource’s corresponding schema. However, to no fault of their own, both extensions fall short when presented with a `Composition` manifest.
Why is that? Well, probably the easiest way to answer this question is to look at a Composition’s schema.
If you haven’t ever drilled into it before, the Composition type is defined as a CustomResourceDefinition in Kubernetes. As with any CRD, you need to define a openAPIv3Schema that tells Kubernetes what the shape of your new API is going to be. Now, it follows that the more expressive the API schema is, the easier it will be to indicate errors when validating a given file against your schema.
For example (using the CronTab CRD example):
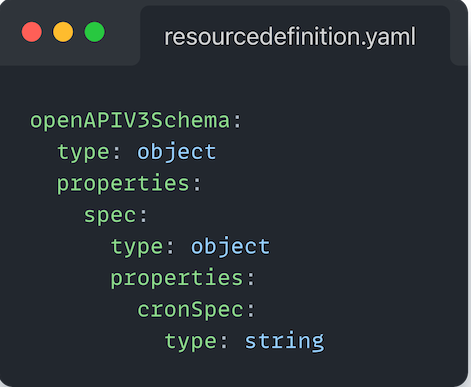
If your CR, you specified:
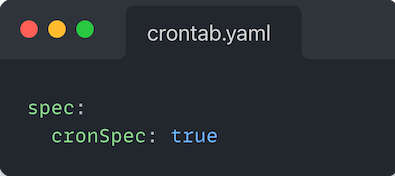
When you applied this resource to your cluster, Kubernetes would return an error indicating that cronSpec was supposed to be of type string, but you supplied a boolean.
However, if you instead modified the above CRD schema to be:
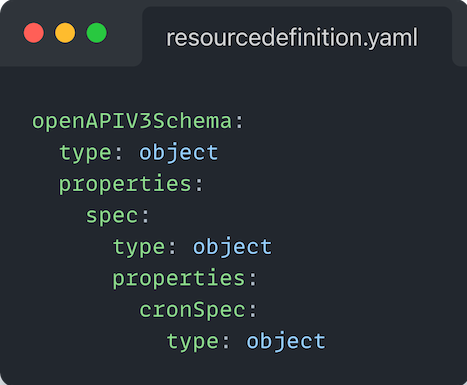
You would now be able to loosely define cronSpec, as long as it was in an object. Meaning all of the following would pass validation checks:
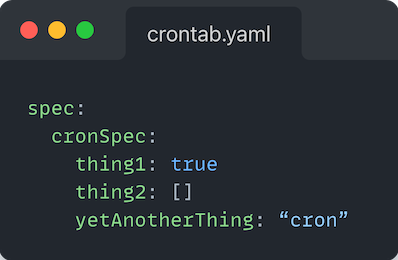
The above is where we get to the root of our issue. Going back to the Composition CRD, we can see here that where we define the resources that make up a Composition, i.e. the resource templates, under base, the type is defined to be an object.
Now, before we start jumping to conclusions, e.g. “let’s define a more restrictive schema for spec.resources[*].base, problem solved”, we need to take a step back. The power behind Composition is the ability to compose any resource, whether that be as a standalone where you want to define a more limited API for your consumers or composed with other resources e.g. a database with an access policy. If we were to define a more restrictive schema for spec.resources[*].base, that would effectively undermine our ability to generically “compose any resource”.
So what do we do?
Language Server
Earlier, we briefly discussed the YAML language support extension. If you’ve ever looked into what went into that extension, you may be surprised to find that the majority of the power behind it actually comes from the corresponding yaml-language-server and not from the JS extension installed in VS Code itself.
OK, so what is a “language server”.
Brief history
From Microsoft themselves:
Language Server is a special kind of Visual Studio Code extension that powers the editing experience for many programming languages. With Language Servers, you can implement autocomplete, error-checking (diagnostics), jump-to-definition, and many other language features supported in VS Code.
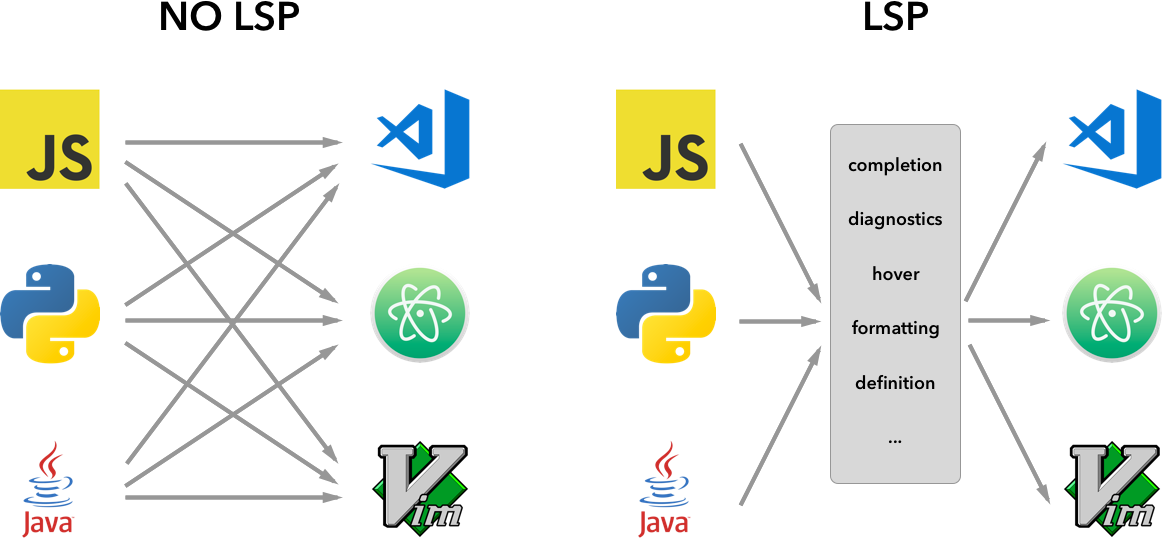
However, while implementing support for language features in VS Code, we found three common problems:
First, Language Servers are usually implemented in their native programming languages, and that presents a challenge in integrating them with VS Code, which has a Node.js runtime.
Additionally, language features can be resource intensive. For example, to correctly validate a file, Language Server needs to parse a large amount of files, build up Abstract Syntax Trees for them and perform static program analysis. Those operations could incur significant CPU and memory usage and we need to ensure that VS Code's performance remains unaffected.
Finally, integrating multiple language toolings with multiple code editors could involve significant effort. From language toolings' perspective, they need to adapt to code editors with different APIs. From code editors' perspective, they cannot expect any uniform API from language toolings. This makes implementing language support for M languages in N code editors the work of M * N.To solve those problems, Microsoft specified Language Server Protocol, which standardizes the communication between language tooling and code editor. This way, Language Servers can be implemented in any language and run in their own process to avoid performance cost, as they communicate with the code editor through the Language Server Protocol. Furthermore, any LSP-compliant language toolings can integrate with multiple LSP-compliant code editors, and any LSP-compliant code editors can easily pick up multiple LSP-compliant language toolings. LSP is a win for both language tooling providers and code editor vendors!
Given the above, what the Red Hat folks have done by implementing a Language Server in order to provide comprehensive YAML support is positioned themselves to provide powerful language features to any client that is able to communicate over the Language Server Protocol. We actually referenced some of those clients at the beginning of the Background section - Atom, IntelliJ (as well as other JetBrains editors), Vim to name a few.
If we could follow their lead and write a language server to respond to events from a given LSP compatible client, we could:
- Potentially solve a number of pain points authors currently have when authoring/editing Crossplane resources.
- Solve it once. Writing the server means it can be used with any compatible client.
That’s actually what we did.
Resource Template Validation with xpls
Up to this point, we’ve discussed what the problem is that we’re attempting to address and why it’s a problem. We’ve also briefly discussed an architectural decision for how we’re going to set ourselves up to solve the problem (using a language server). Let’s now dive into how we went about providing validation diagnostics to LSP clients.
Note: we’re going to focus primarily on validation itself and not really touch on how we implemented the handlers for the language server to respond to requests from LSP clients. There are quite a few examples out in the world for how folks have gone about implementing the LSP handlers. So if that is something you’re interested in diving into more, I highly recommend checking out those examples.
Note: The LSP handlers implementation for
xplscan be found here.
Let’s start this off by looking at what we’re trying to accomplish. Starting with a well known example, straight from the crossplane.io docs, the below Composition describes the resources that make up a XPostgreSQLInstance:
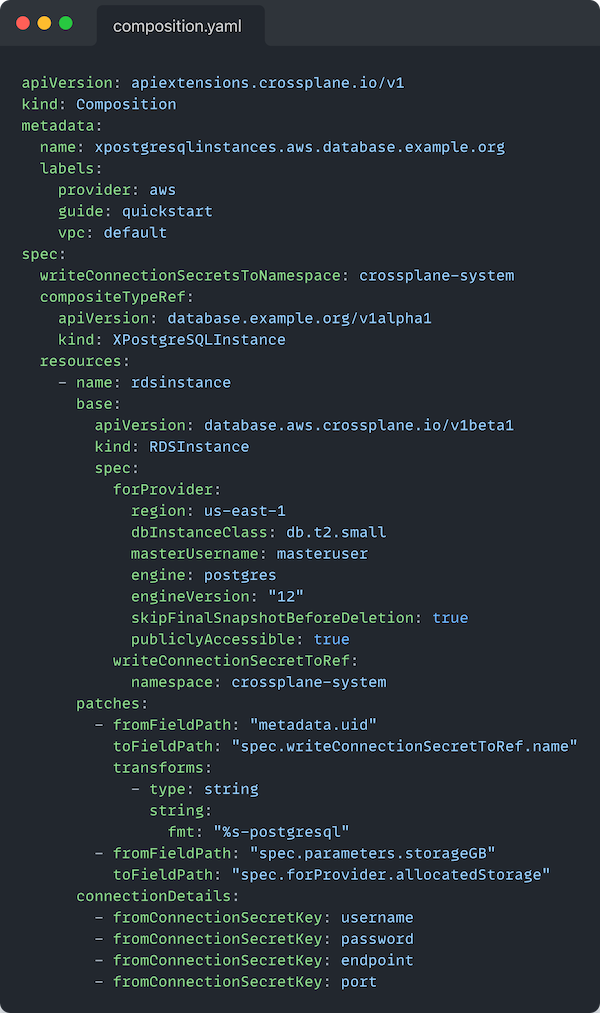
Based on what we covered earlier, we should expect to have basic schema validations all of the way down until we reach (if we were using one of the extensions mentioned earlier):
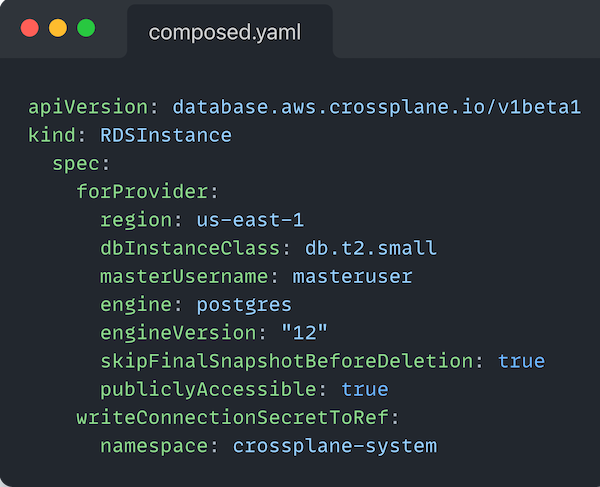
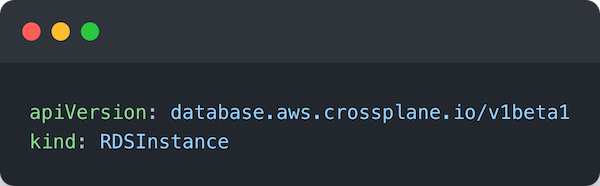
at spec.resources[0].base (in YAML Path parlance).
What we have here, is a manifest for a v1beta1/RDSInstance from the database.aws.crossplane.io group - i.e. the CRD commonly found in the crossplane/provider-aws package. If we had a way to use the CRD for the RDSInstance AND a way to get just the `RDSInstance` manifest from the `Composition` we could potentially use the same mechanisms the Kubernetes api-server uses to validate custom resource requests before creating the resource.
How does Kubernetes validate Custom Resource requests against a CRD
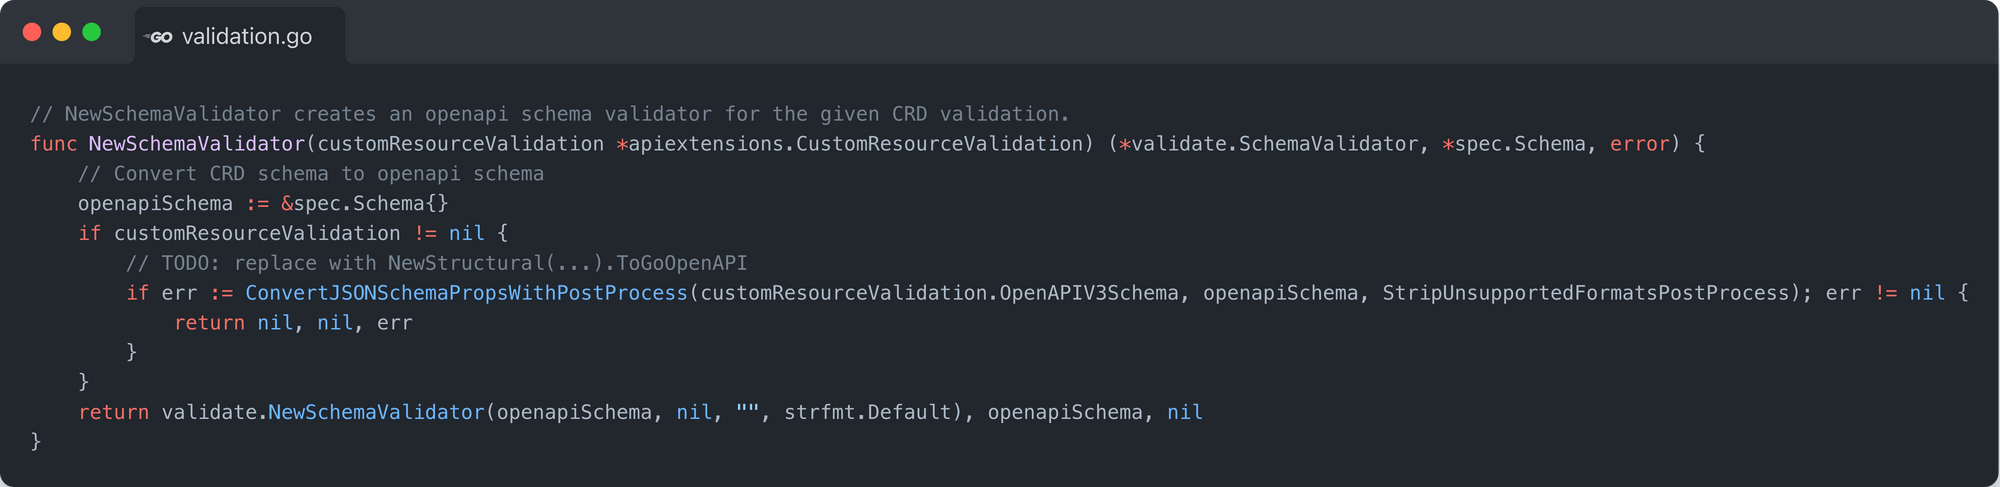
A few months ago a colleague of mine, Daniel Mangum, wrote a blogpost detailing how Kubernetes validates Custom Resources. The quick summary of what he found was that within the apiextensions-apiserver, there is a function called NewSchemaValidator that takes as its argument an apiextensions.CustomResourceValidation and returns:
- A new validate.SchemaValidator that was constructed from the OpenAPIV3Schema from the CustomResourceValidation.
- The converted spec.Schema from the OpenAPIV3Schema.
- And an error if one exists.
The snippet looks like this:
Once the validate.SchemaValidator has been constructed, anytime a new Custom Resource request comes into the api-server, the unmarshalled representation is passed to the Validate() method which then returns the validation results (errors and warnings) in the form of a validate.Result.
Lastly, the validate.Result members look like:
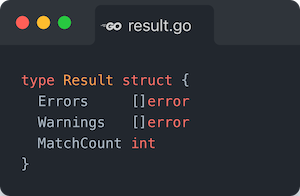
While being of type error, they are also of type errors.Validation whose Name member actually holds the YAML Path string of where the validation error/warning occurred, e.g. something like spec.resources[0].connectionDetails[1].fromConnectionSecretKey. That, combined with the details added to the message field and you’ll receive a message similar to the following if you submitted a number as the value for fromConnectionSecretKey:

How can we isolate the resource template manifest in a Composition
Given all of the “subtle” references to the use of YAML path above, ideally if we could find a way to parse the Composition file into a YAML AST and subsequently be able to traverse the tree using YAML path notation we would have two pieces of our puzzle: using YAML path notation theoretically making it easy to both look up the piece of the file we want to validate as well as isolate the part of a file that had a validation error.
Luckily, there exists a great open source project called goccy/go-yaml that does exactly that. Using the APIs provided by go-yaml, we’re able to:
- Read each file in from the workspace filesystem.
- Parse the file into an AST.
- Store the AST for quick retrieval later.
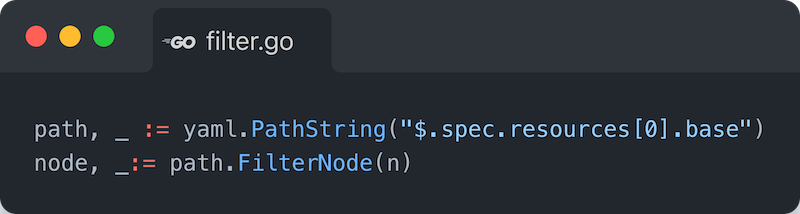
Then given an AST we’re able to filter down to a Node within the tree using a YAML path string, e.g. using our example from above, given an AST representing

We can do something like this to acquire the node corresponding to the RDSInstance manifest:
How do we get the CustomResourceDefinition for our resource template
For those that have authored a Crossplane package before, you know that you need to define a crossplane.yaml file. This file is used to instruct Crossplane on how to install the parts that make up your package. An example of this, again using the well known getting-started-with-aws package, looks like:
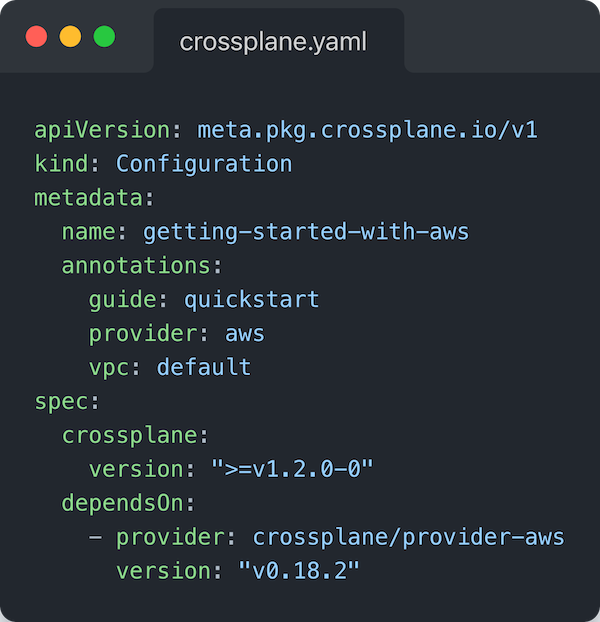
The key piece above to hone in on is under the spec.dependsOn field. We have defined that this package “depends on” the APIs that come from crossplane/provider-aws, specifically version `v0.18.2`.
We’ll cover dependency management more in a later blogpost in this series. For now, we use that declaration to pull in the external CustomResourceDefinition that corresponds to RDSInstance in our example.
Bringing it all together
In the last few sections, we covered the critical components that we can use in conjunction to inform the composition author of any errors in their resource templates. Let’s walk through what that looks like, bringing in events from received by the language server:
- The user saves their composition.yaml that contains the xpostgresqlinstances.aws.database.example.org composition from our example above.
- xpls, the Crossplane Language Server, receives the corresponding textDocument/didSave event from the LSP client which includes the path URI of the file that changed.
- Internally, the server reads the contents of the composition.yaml file that was just saved and the file is parsed into its AST representation.
- The Group Version Kind (GVK) of the composed resource
5. The AST node corresponding to the composed resource is then supplied to the SchemaValidator’s Validate() method in order to derive the validation Result.
Finally, in step 6, for each error in the validation Result, the Name and Message are extracted:
- The Name is used to look up the AST Node corresponding to the given YAML path string. In addition the cursor positions are derived from the token corresponding to the derived Node.
- The Message is used to provide additional context for the error.
- Together they are supplied to a new textDocument/publishDiagnostics event that includes the start and end positions derived from the token in 1, the message indicating a human readable error, as well as the the severity of the error (this dictates whether the user sees a read or yellow squiggly line)
- The diagnostic is then sent to the LSP client for rendering to the user.
Summary
In this post, we covered why there was a gap in existing tooling for Composition validations, what a language server is and why it was a good choice for enabling our validation feedback loops, we gave an overview of how Kubernetes validates Custom Resource requests against the CustomResourceDefinition, and finally, how we brought all of these concepts together to begin to make strides towards addressing the author workflow gaps when working with Crossplane resources.
In the next post, we’ll dig into how we manage and use external dependencies in order to inform resource validations.
Lastly, if you haven’t checked it out yet, the VSCode extension can be found here. If you have features you’d like to see that would better enable your authoring workflows, thoughts on the current features, or happen to find a bug; feel free to file an issue, start a discussion, or reach out to us on Slack.
Subscribe to the Upbound Newsletter