GitOpsify Cloud Infrastructure with Crossplane and Flux


October 11, 2022
Piotr Zaniewski
Reading time: 8 min read
Share:
This article was originally posted on medium. In this article, we are going to learn how to automate the provisioning of cloud resources via Crossplane and combine it with GitOps practices.
You will most benefit from this blog if you are a Platform or DevOps Engineer, Infrastructure Architect or Operations Specialist.
Note: If you are one of the above, we are hiring for various engineering roles. View our open roles here.
If you are new to GitOps, read more about it in my blog GitOps with Kubernetes
Let’s set the stage by imagining the following context. We are working as a part of a Platform
Team in a large organization. Our goal is to help Development Teams to onboard get up to speed with using our Cloud Infrastructure. Here are a few base requirements:
- Platform Team doesn’t have resources to deal with every request individually, so there must be a very high degree of automation
- Company policy is to adopt the principle of least privilege. We should expose the cloud resources only when needed with the lowest permissions necessary.
- Developers are not interested in managing the cloud, they should only consume cloud resources without even needing to login to a cloud console.
- New Teams should get their own set of cloud resources for self-managing when on-boarding to the Platform.
- It should be easy to provision new cloud resources on demand.
Initial Architecture
The requirements lead us to an initial architecture proposal with the following high-level solution strategy.
- create template repositories for various types of workloads (using Backstage Software Templates would be helpful)
- once a new Team is onboarded and creates the first repository from a template, it will trigger a CI pipeline and deploy common infrastructure components by adding the repository as Source to Flux infrastructure repo
- once a Team wants to create more cloud infrastructure, they can place the Crossplane claim YAMLs in the designated folder in their repository
- adjustments to this process are easily implemented using Crossplane Compositions
In a real world scenario we would manage Crossplane also using Flux, but for demo purposes we are focusing only on the application level.
The developer experience should be similar to this:

Tools and Implementation
Knowing the requirements and initial architecture, we can start selecting the tools. For our example, the tools we will use are Flux and Crossplane.
We are going to use Flux as a GitOps engine, but the same could be achieved with ArgoCD or Rancher Fleet.
Let’s look at the architecture and use cases that both tools support.
Flux Architecture Overview
Flux exposes several components in the form of Kubernetes CRDs and controllers that help with expressing a workflow with the GitOps model. Short description of 3 major components. All those components have their corresponding CRDs.

Source Controller main role is to provide a standardized API to manage sources of the Kubernetes deployments; Git and Helm repositories.
apiVersion: source.toolkit.fluxcd.io/v1beta1
kind: GitRepository
metadata:
  name: podinfo
  namespace: default
spec:
  interval: 1m
  url: <https://github.com/stefanprodan/podinfo>
Kustomize Controller this is a CD part of the workflow. Where source controllers specify sources for data, this controller specifies what artifacts to run from a repository.
apiVersion: kustomize.toolkit.fluxcd.io/v1beta2
kind: Kustomization
metadata:
  name: webapp
  namespace: apps
spec:
  interval: 5m
  path: "./deploy"
  sourceRef:
    kind: GitRepository
    name: webapp
    namespace: shared
This controller can work with kustomization files, but also plain Kubernetes manifests
Helm Controller this operator helps manage Helm chart releases containing Kubernetes manifests and deploy them onto a cluster.
apiVersion: helm.toolkit.fluxcd.io/v2beta1
kind: HelmRelease
metadata:
  name: backend
  namespace: default
spec:
  interval: 5m
  chart:
    spec:
      chart: podinfo
      version: ">=4.0.0 <5.0.0"
      sourceRef:
        kind: HelmRepository
        name: podinfo
        namespace: default
      interval: 1m
  upgrade:
    remediation:
      remediateLastFailure: true
  test:
    enable: true
  values:
    service:
      grpcService: backend
    resources:
      requests:
        cpu: 100m
        memory: 64Mi
Crossplane Architecture Overview
Let’s look at what the Crossplane component model looks like. A word of warning, if you are new to Kubernetes this might be overwhelming, but there is value in making an effort to understand it. The below diagram shows the Crossplane component model and its basic interactions.

Learn more about Crossplane in my blog “Infrastructure as Code: the next big shift is here”
Demo
If you want to follow along with the demo, clone this repository, it contains all the scripts to run the demo code.
Prerequisites
In this demo, we are going to show how to use Flux and Crossplane to provision an EC2 instance directly from a new GitHub repository. This simulates a new team onboarding to our Platform.
To follow along, you will need AWS CLI configured on your local machine.
Once you obtain credentials, configure the default profile for AWS CLI following this tutorial.
Locally installed you will need:
- Docker Desktop or other container run time
- WSL2 if using Windows
- kubectl
Run make in the root folder of the project, this will:
If you are running on a Mac, use make setup_mac instead of make
- Install kind (Kubernetes IN Docker) if not already installed
- Create KIND cluster called crossplane-cluster and swap context to it
- Install crossplane using helm
- Install crossplane CLI if not already installed
- Install flux CLI if not already installed
- Install AWS provider on the cluster
- Create a temporary file with AWS credentials based on the default CLI profile
- Create a secret with AWS credentials in the crossplane-system namespace
- Configure AWS provider to use the secret for provisioning the infrastructure
- Remove the temporary file with credentials so it’s not accidentally checked in the repository
Following tools need to be installed manually
IMPORTANT: The demo code will create a small EC2 Instance in eu-central-1 region. The instance and underlying infrastructure will be removed as part of the demo, but please make sure all the resources were successfully removed and in case of any disruptions in the demo flow, be ready to remove the resources manually.
Setup Flux Repository
- create a new KIND cluster with
make, this will install Crossplane with AWS provider and configure secret to access selected AWS account - Flux CLI was installed as part of the Makefile script, but optionally you can configure shell completion for the CLI
. <(flux completion zsh) - Refer to the Flux documentation page for more installation options
- create an access token in GitHub with full repo permissions.

- export variables for your GitHub user and the newly created token
export GITHUB_TOKEN=<token copied form GitHub>
export GITHUB_USER=<your user name>
- use flux to bootstrap a new GitHub repository so flux can manage itself and underlying infrastructure
Flux will look for GITHUB_USER and GITHUB_TOKEN variables and once found will create a private repository on GitHub where Flux infrastructure will be tracked.
flux bootstrap github  \\
        --owner=${GITHUB_USER} \\
        --repository=flux-infra \\
        --path=clusters/crossplane-cluster  \\
        --personal
Setup Crossplane EC2 Composition
Now we will install a Crossplane Composition that defines what cloud resources to crate when someone asks for an EC2 claim.
- setup Crossplane composition and definition for creating EC2 instances
kubectl crossplane install configuration piotrzan/crossplane-ec2-instance:v1- fork repository with the EC2 claims
gh repo fork https://github.com/Piotr1215/crossplane-ec2and answer YES when prompted whether to clone the repository
Clone Flux Infra Repository
- clone the flux infra repository created in your personal repos
git clone git@github.com:${GITHUB_USER}/flux-infra.gitcd flux-infra
Add Source
- add source repository to tell Flux what to observe and synchronize
- Flux will register this repository and every 30 seconds check for changes.
- execute below command in the flux-infra repository, it will add a Git Source
flux create source git crossplane-demo \\
   --url=https://github.com/${GITHUB_USER}/crossplane-ec2.git \\
   --branch=master \\
   --interval=30s \\
   --export > clusters/crossplane-cluster/demo-source.yaml
- the previous command created a file in clusters/crossplane-cluster subfolder, commit the file
git add .
git commit -m "Adding Source Repository"
git push
- execute
kubectl get gitrepositories.source.toolkit.fluxcd.io -Ato see active Git Repositories sources in Flux
Create Flux Kustomization
- setup watch on the AWS managed resources, for now, there should be none
watch kubectl get managed- create Flux Kustomization to watch for a specific folder in the repository with the Crossplane EC2 claim
flux create kustomization crossplane-demo \\
  --target-namespace=default \\
  --source=crossplane-demo \\
  --path="./ec2-claim" \\
  --prune=true \\
  --interval=1m \\
  --export > clusters/crossplane-cluster/crossplane-demo.yaml
git add .
git commit -m "Adding EC2 Instance"
git push
- after a minute or so you should see a new EC2 Instance being synchronized with Crossplane and resources in AWS

Recap
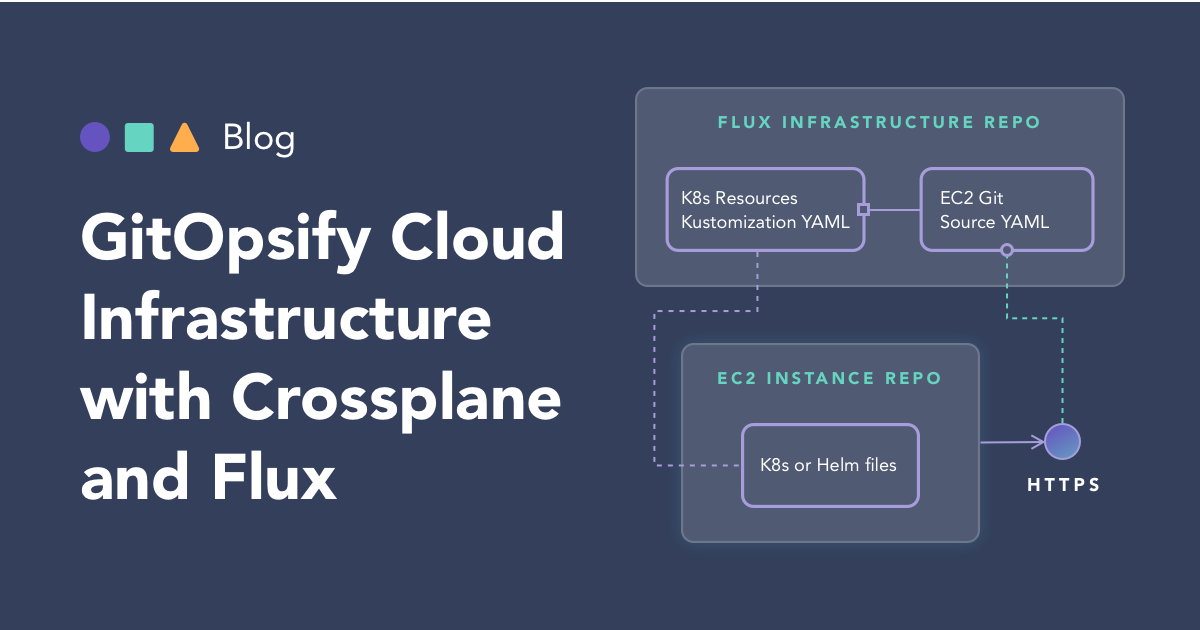
Let’s take a step back and make sure we understand all the resources and repositories used.

The first repository we have created is what Flux uses to manage itself on the cluster as well as other repositories. To tell Flux about a repository with Crossplane EC2 claims, we have created a GitSource YAML file that points to the HTTPS address of the repository with the EC2 claims.
The EC2 claims repository contains a folder where plain Kubernetes manifest files are located. To tell Flux what files to observe, we have created a Kustomization and linked it with GitSource via its name. Kustomization points to the folder containing K8s manifests.
Cleanup
- to clean up the EC2 Instance and underlying infrastructure, remove the claim-aws.yaml demo from the crossplane-ec2 repository
rm ec2-claim/claim-aws.yaml
git add .
git commit -m "EC2 instance removed"
- after a commit or timer lapse Flux will synchronize and Crossplane will pick up the removed artifact and delete cloud resources
the ec2-claim folder must be present in the repo after the claim yaml is removed, otherwise Flux cannot reconcile
Manual Cleanup
In case you cannot use the repository, it's possible to cleanup the resources by deleting them from flux.
- deleting Flux kustomization
flux delete kustomization crossplane-demowill remove all the resources from the cluster and AWS - to clean up the EC2 Instance and underlying infrastructure, remove the ec2 claim from the cluster
kubectl delete VirtualMachineInstance sample-ec2
Cluster Cleanup
- wait until
watch kubectl get managedthe output doesn't contain any AWS resources - delete the cluster with
make cleanup - optionally remove the
flux-infrarepository
Summary
GitOps with Flux or Argo CD and Crossplane offers a very powerful and flexible model for Platform builders. In this demo, we have focused on the applications side with Kubernetes clusters deployed some other way, either with Crossplane or Fleet or Cluster API etc.
What we achieved on top of using Crossplane’s Resource Model is the fact that we do not interact with kubectl directly any longer to manage resources, but rather delegate this activity to Flux. Crossplane still runs on the cluster and reconciles all resources. In other words, we’ve moved the API surface from kubectl to Git.
Subscribe to the Upbound Newsletter