Crossplane first look: What most people get wrong (and how to get it right)

November 16, 2022
Jared Watts
Reading time: 7 min read
Share:
This was originally posted on the New Stack here.

A Flexible Framework
Crossplane is a popular open source Cloud Native Computing Foundation project that provides a framework to help you build your own opinionated cloud native control plane – complete with all of the policy, best practices and configuration that’s important to your organization. A vibrant and healthy community has rallied around the project as a neutral place for vendors and individuals to come together and collaborate on enabling a new approach to managing all of your resources.
What do we mean by Crossplane being a framework? Crossplane contains the logic, machinery and reusable components that can be assembled to achieve your organization’s unique vision of efficiently and reliably delivering infrastructure and applications to production. You can think of this framework as the “building blocks” for creating specialized and customized platforms.
While this framework approach provides extreme flexibility to cover a wide variety of unique use cases, it means that there is no one-size “solution” that fits everyone. The units of functionality offered by the Crossplane framework must be constructed into a bigger picture, and this can often be challenging to navigate without some assistance.
Let’s take some first steps together today by exploring a bit of introductory material that will jump-start your productivity with Crossplane right away.
Critical Crossplane Concepts
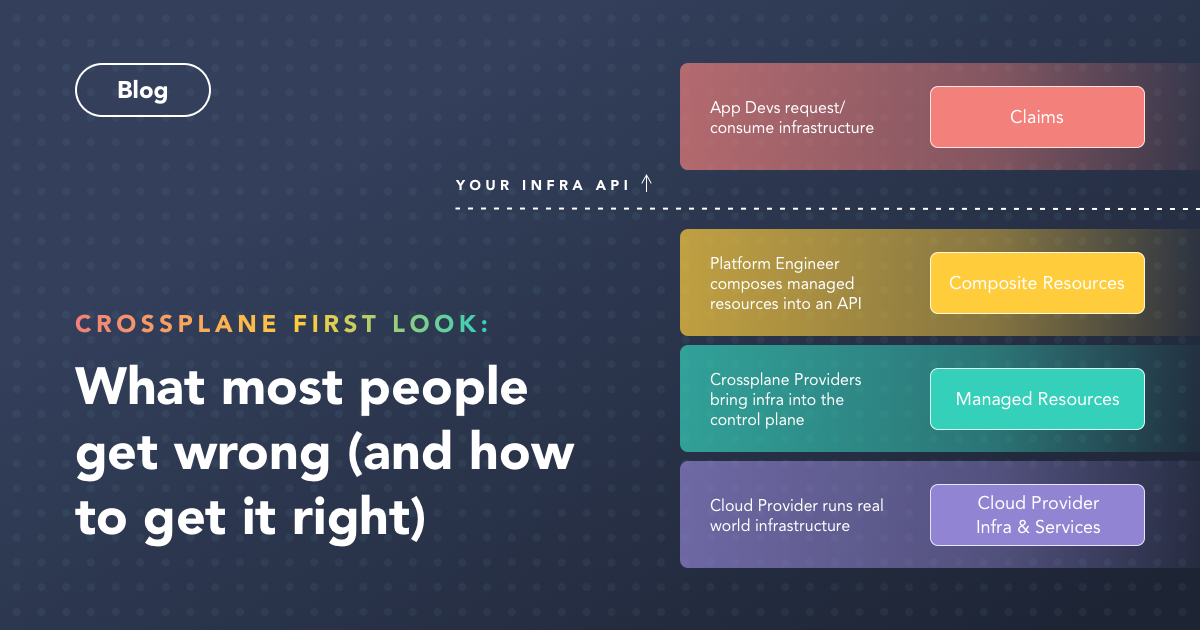
As folks new to the Crossplane community begin to learn about its key concepts, they can be confused about the responsibilities and purpose of the various architectural components. A really helpful mental model to make sense of the functional areas of Crossplane is a series of “layers” that build upon one another as shown in the diagram below.

Starting at the bottom layer in the diagram, we have:
- Cloud provider infrastructure and services are all of the resources you think of when you go to your cloud provider of choice and browse the available services they offer, such as Amazon S3 buckets, Google CloudSQL database, Azure AKS clusters, etc. These exist in the real world outside of Crossplane.
- Managed resources are the next layer up and are how Crossplane brings this real world infrastructure into the control plane to expose them as extensions to the Kubernetes API. Much like Kubernetes has built-in objects for Pod, ConfigMap and Deployment, Crossplane exposes objects for S3, CloudSQL, AKS, etc.
- Composite resources are built on top of managed resources by the platform engineer. They compose together multiple resources along with configuration and policy into their own custom abstraction or API that is then exposed to their developers for self-service access to infrastructure.
- Claims are the highest layer of functionality and are what the end user developers work with directly. When they need infrastructure alongside their applications, they simply create a claim and the underlying layers will ensure a real-world instance is provisioned and ready for consumption.
Now that we have cleared up the relationships between the key concepts of Crossplane, we’ll leave you with another tip for successfully adopting this resource model. Crossplane is all about extending the control plane with new types that represent real-world infrastructure and services. Similarly, the composite resources that you define for your platform also extend the surface area of the control plane’s API, so it’s helpful to also think of these abstractions as first-class citizens of the API too, just like Pods and ConfigMaps.
Getting Our Hands Dirty
One of the most effective ways to start internalizing these concepts is to see them in action by trying out Crossplane for yourself. The Crossplane documentation has a getting started guide, which walks you through a practical exercise that uses all the layers of functionality we just explored together.
Let’s break down what you will have accomplished by the end of this guide:
- Install Crossplane into your cluster to extend the control plane with infrastructure management capabilities
- Connect the control plane to your cloud provider of choice so it can provision and manage resources in the cloud on your behalf
- Define a new custom abstraction for Postgres that composes together infrastructure resources and exposes them as a simple declarative API for your developers
- Provision a new Postgres instance using the new API you defined, as well as an application that consumes this new database
One important yet often overlooked nuance of this simple flow is that it blends together a couple of distinct personas. Crossplane supports a strong separation of concerns between the platform builder and the platform consumer. The builder has full permissions to configure and compose the granular resources into abstractions as part of an API, while the consumer has limited access to just these APIs, allowing them to provision new infrastructure for their applications according to the guardrails that their platform builder specified. It is helpful to be mindful of this separation and multiple personas when first getting your hands dirty with Crospslane within this streamlined flow.
When it Doesn’t Work out as Planned
Configuring cloud provider infrastructure and services can be a complicated task that doesn’t always result in success on the first attempt. We’ve seen new users sometimes struggle with identifying the root cause of runtime issues they encounter while building their platforms, so we wanted to share a few tips to help you get to the bottom of any problems, should they arise.
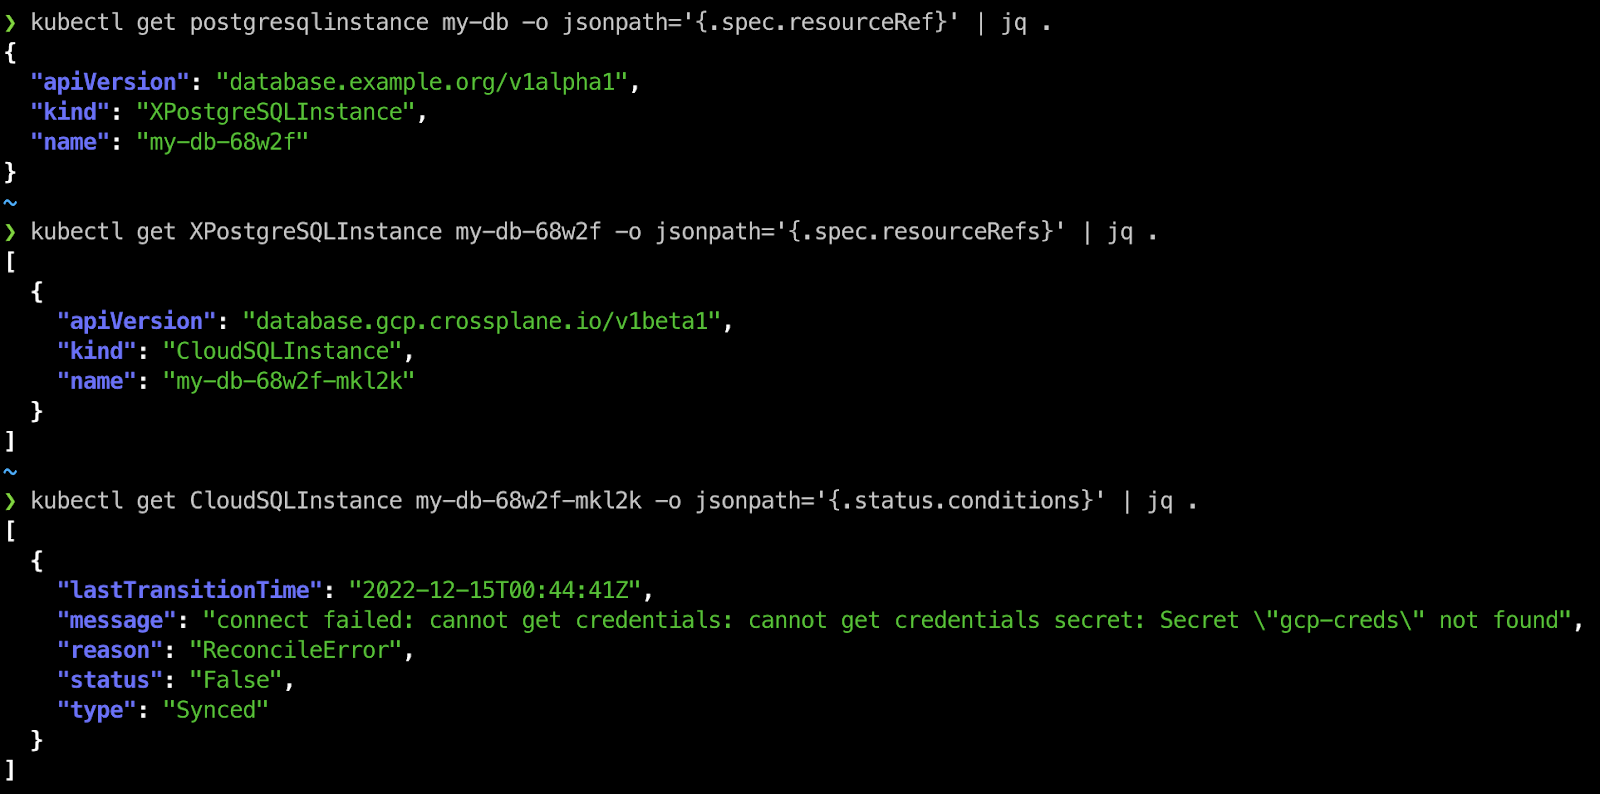
- Status and conditions — Crossplane has a very consistent resource model for all objects within the control plane, so you can expect every resource to have a status section that will give you up-to-date details about the most recent observed state from the real world. This status section should be your first place to check for errors, especially the conditions list, which can give you insight into why a resource isn’t provisioning or getting to a “ready” state.
- Events tell a story — Like many well-behaved Kubernetes objects, all Crossplane objects will emit events that detail noteworthy milestones within its life cycle. These events will tell a story of the history of the object and often help you understand the most recent action taken and the result.
- Follow the chain of references — We saw earlier that Crossplane has multiple “layers.” One of the most important troubleshooting concepts is that you sometimes need to follow the references between the layers to get to the root cause. For instance, starting with the developer- facing claim, you often need to check the composite resource that it references, and subsequently the managed resources that it is composed of. You should always try to follow this chain of references, like peeling back the layers of an onion, to get deeper insight into the objects within lower layers of Crossplane’s layered functionality.
Walk, Crawl…Run?
We’ve covered some basics about Crossplane architecture and building a very simple platform, so let’s talk about the next steps for continuing to progress on your Crossplane journey. At this point, you may have a grand vision forming in your head of how your control plane will automate the life cycle of all the infrastructure in your entire organization. That’s exciting, but it’s wise to narrow the scope down to a more practical and quickly attainable goal.
We recommend that you start with a tangible, but reasonably scoped scenario as you transition from docs and guides to your own custom platform. For example, you could start with a single infrastructure resource that you want to expose to your development team and get that working first before moving on to further resource needs. Or you could start with a small “spike” of functionality, such as provisioning an application cluster and a single database for those apps to store their state.
This app cluster and database “spike” is exactly what is implemented in Upbound’s reference platform for AWS. In this detailed example, you can see how resources are abstracted and exposed to developers, how limited configuration details from the developer are patched down to the managed resources and how this entire platform is packaged up into a Crossplane configuration for reuse and distribution across multiple teams.
We encourage you to dive deeper into this AWS reference platform to get a better understanding of how to scope your first practical platform scenario, as well as see a few advanced examples of composition authoring.
Charting a Course with the Experts
In this article, we’ve demystified the key concepts and layers of Crossplane, learned techniques for deeper observability into the control plane’s runtime and explored the first concrete steps to starting building your own platform. As you continue defining your platform and consider how to deploy and run it in critical production environments, you’ll likely also consider how you can accelerate this effort.
Upbound created the Crossplane project in 2018 with a vision to take the cloud native space to a new level. As the inventors of this technology, the folks at Upbound are uniquely positioned with a wealth of knowledge and understanding that enables them to effectively harness Crossplane’s capabilities into a complete solution that fits your specific needs. They are ready and more than happy to be your expert guide and ensure your platform is built according to best practices and fit for production demands.
If you are interested in leveraging the power of control planes without needing to worry about operational concerns, or managing the underlying infrastructure, try out Upbound for yourself. Enable SRE teams with a more efficient workflow and the building blocks of platform engineering by setting up your first cloud platform powered by Upbound’s managed control planes. Sign up for your 30 day free trial here!
Subscribe to the Upbound Newsletter